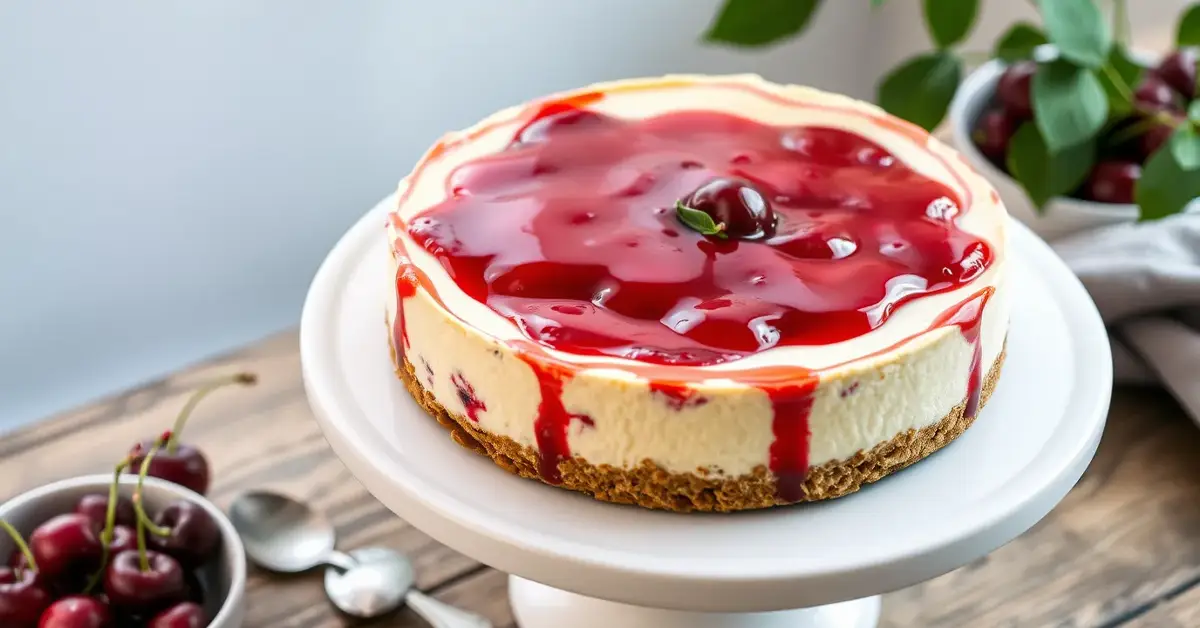
If you’re craving a rich, creamy, and absolutely irresistible dessert, this No Bake Cherry Cheesecake is the perfect treat! With a buttery graham cracker crust, velvety smooth cheesecake filling, and a luscious cherry topping, this recipe delivers indulgent flavors without the need for an oven.
This quick and simple dessert is ideal for holidays, potlucks, or any occasion when you need a fuss-free yet impressive sweet treat. The best part? It requires just a few ingredients, and with minimal effort, you’ll have a delicious homemade cheesecake that everyone will love.
Whether you’re a beginner or an experienced home baker, this no bake cheesecake recipe guarantees a light, creamy texture with the perfect balance of sweetness and tang. Let’s dive in and learn how to make this classic dessert in just a few easy steps!
Why You’ll Love This No Bake Cherry Cheesecake

This No Bake Cherry Cheesecake is the perfect dessert when you want something quick, delicious, and hassle-free. Whether you’re preparing for a special occasion or just craving a sweet, creamy treat, this recipe is a guaranteed crowd-pleaser. Here’s why you’ll love making (and eating) this indulgent dessert!
Perfect for Any Occasion
One of the best things about this no bake cheesecake is its versatility. It’s a great dessert for holidays, birthdays, dinner parties, or casual get-togethers. Since it requires no baking, it’s especially perfect for hot summer days when you don’t want to turn on the oven but still crave something sweet and satisfying.
- Great for beginners – No complicated techniques, just mix, chill, and enjoy!
- Time-saving – This cheesecake comes together in minutes, making it perfect for last-minute desserts.
- Make-ahead friendly – Since it needs time to chill, you can prepare it the night before and serve it when needed.
This dessert is light, refreshing, and always a hit, making it ideal for any event, from a casual family dinner to an elegant celebration.
Creamy, Sweet, and Tangy Flavor
The beauty of this No Bake Cherry Cheesecake lies in its incredible balance of flavors and textures. Every bite delivers a creamy and smooth cheesecake filling, a buttery graham cracker crust, and a sweet yet slightly tart cherry topping that ties everything together.
- The cream cheese filling is rich and velvety, with just the right amount of sweetness.
- The graham cracker crust adds a slight crunch, perfectly complementing the soft filling.
- The cherry pie topping provides a fruity, tangy contrast that enhances the overall flavor.
The combination of sweet, tangy, and creamy elements makes this cheesecake absolutely irresistible. Plus, if you love classic cheesecake flavors but don’t want to deal with baking or water baths, this is the perfect alternative!
Whether you’re serving this at a gathering or enjoying it as a personal indulgence, this No Bake Cherry Cheesecake will quickly become a go-to recipe in your collection.
Ingredients You’ll Need

Making this No Bake Cherry Cheesecake is incredibly easy, and the best part is that you only need a handful of simple, readily available ingredients. Each ingredient plays a crucial role in creating the perfect texture, flavor, and overall structure of this creamy, dreamy cheesecake. Let’s break them down!
For the Cheesecake Filling
The cheesecake filling is the heart of this dessert. It should be light, creamy, and perfectly sweet while maintaining a smooth, velvety consistency.
- Cream Cheese (16 oz, softened) – The base of the cheesecake, giving it its rich and creamy texture. Use full-fat cream cheese for the best results. Ensure it’s softened at room temperature to avoid lumps in the filling.
- Powdered Sugar (¾ cup) – Adds the perfect amount of sweetness while keeping the filling smooth and lump-free. Unlike granulated sugar, powdered sugar dissolves easily, ensuring a silky consistency.
- Vanilla Extract (1 teaspoon) – Enhances the flavor and adds a touch of warmth and depth to the cheesecake.
- Whipped Topping (8 oz, like Cool Whip) – Lightens the texture and makes the cheesecake fluffy and airy. If you prefer homemade whipped cream, you can substitute it with 1 cup of heavy whipping cream whipped to stiff peaks.
For the Crust
The crust provides a slightly crunchy, buttery contrast to the smooth cheesecake filling.
- Graham Cracker Crumbs (1 ½ cups) – The base of the crust, adding a classic sweet, slightly nutty flavor that pairs beautifully with the creamy cheesecake. You can also use crushed digestive biscuits or vanilla wafer cookies for a twist.
- Melted Butter (6 tablespoons) – Helps bind the graham cracker crumbs together and creates a firm base. Make sure the butter is fully melted so it mixes evenly with the crumbs.
- Granulated Sugar (2 tablespoons, optional) – Adds a slight sweetness to the crust and helps it hold its shape better.
For the Cherry Topping
The sweet, tangy cherry topping is what gives this cheesecake its iconic flavor and vibrant appearance.
- Cherry Pie Filling (1 can, 21 oz) – A classic choice for cherry cheesecake, providing a glossy, fruity topping with a balance of sweet and tart flavors. You can use homemade cherry pie filling if you prefer.
- Fresh Cherries (optional, for garnish) – If you want to enhance the presentation, garnish the cheesecake with fresh cherries or a drizzle of cherry sauce.
Optional Additions & Variations
Want to customize your No Bake Cherry Cheesecake? Here are some fun variations:
- Chocolate Crust – Swap the graham crackers for crushed Oreo cookies for a rich, chocolatey contrast.
- Lemon Zest (½ teaspoon in the filling) – Adds a bright, citrusy note to balance the sweetness.
- Almond Extract (¼ teaspoon in the filling) – Enhances the cherry flavor for a bakery-style taste.
- Whipped Cream & White Chocolate Shavings (for garnish) – Elevate your cheesecake with an extra touch of indulgence.
By using high-quality, fresh ingredients, you’ll get the most delicious, creamy, and flavorful cheesecake without ever needing to turn on the oven!
How to Make No Bake Cherry Cheesecake

Making this No Bake Cherry Cheesecake is incredibly simple and requires no special baking skills. With just a few easy steps, you’ll have a creamy, dreamy dessert that’s perfect for any occasion. Follow this step-by-step guide to create a light, fluffy cheesecake with a buttery crust and a luscious cherry topping.
Step 1: Prepare the Graham Cracker Crust
The graham cracker crust provides a firm and slightly crunchy base that balances the creamy filling.
- Crush the Graham Crackers – If using whole crackers, place them in a food processor and pulse until fine crumbs form. Alternatively, put them in a ziplock bag and crush them with a rolling pin. You should have 1 ½ cups of crumbs.
- Mix with Butter & Sugar – In a medium bowl, combine the graham cracker crumbs, melted butter, and sugar (if using). Stir until the mixture resembles wet sand.
- Press into the Pan – Pour the crust mixture into a 9-inch springform pan or pie dish. Use the back of a spoon or the bottom of a measuring cup to firmly press it down into an even layer.
- Chill the Crust – Place the crust in the refrigerator for at least 10–15 minutes while you prepare the filling. Chilling helps the crust set, making it easier to slice later.
Step 2: Make the Cheesecake Filling
This step creates the smooth, velvety cheesecake layer that makes this dessert so irresistible.
- Soften the Cream Cheese – Ensure your cream cheese is at room temperature so it blends smoothly without lumps.
- Beat the Cream Cheese & Sugar – In a large mixing bowl, use a hand mixer or stand mixer to beat the cream cheese and powdered sugar until smooth and creamy.
- Add Vanilla Extract – Mix in vanilla extract for extra flavor.
- Fold in the Whipped Topping – Gently fold in the whipped topping (Cool Whip or homemade whipped cream) using a spatula. Be careful not to overmix—you want the mixture to stay light and fluffy.
- Spread Over the Crust – Take the chilled crust out of the fridge and evenly spread the cheesecake filling over the crust using a spatula. Smooth out the top for an even layer.
Step 3: Add the Cherry Topping
The sweet, tangy cherry topping is what makes this cheesecake stand out!
- Spoon the Cherry Pie Filling – Gently spread the cherry pie filling over the cheesecake layer. Be careful not to mix it into the filling—just let it sit on top.
- Smooth & Spread Evenly – Use the back of a spoon to evenly distribute the cherries across the surface.
Step 4: Chill & Serve
This cheesecake needs time to set for the best texture.
- Refrigerate for at Least 4 Hours – Cover the cheesecake with plastic wrap and place it in the refrigerator for at least 4 hours, or ideally overnight. This allows the flavors to meld and the cheesecake to firm up.
- Slice & Serve – Once fully chilled, remove from the fridge and slice with a sharp knife, wiping the blade between cuts for clean slices.
Bonus Tips for the Best No Bake Cherry Cheesecake
- Want a firmer texture? Chill for 6+ hours for a sturdier cheesecake that slices neatly.
- For clean slices: Run your knife under hot water, dry it, then slice.
- Customize your topping: Swap cherry pie filling for blueberry, strawberry, or mixed berry compote for a fun twist!
This No Bake Cherry Cheesecake is now ready to enjoy—creamy, sweet, and bursting with cherry goodness!
Expert Tips & Variations

To make your No Bake Cherry Cheesecake truly perfect, here are some expert tips and fun variations that can help you customize and enhance your dessert. Whether you want to achieve the creamiest texture, try a different crust, or experiment with toppings, these ideas will elevate your cheesecake to the next level!
Expert Tips for the Best No Bake Cherry Cheesecake
✅ Use Full-Fat Cream Cheese – Always opt for full-fat cream cheese for the creamiest, most indulgent texture. Low-fat or fat-free versions may result in a runnier consistency.
✅ Soften Cream Cheese Properly – Let the cream cheese sit at room temperature for about 30 minutes before mixing. This prevents lumps and ensures a smooth filling.
✅ Don’t Overmix the Filling – When folding in the whipped topping, mix gently to keep the cheesecake light and fluffy. Overmixing can deflate the filling and make it dense.
✅ Chill for at Least 4 Hours (or Overnight!) – Patience is key! The cheesecake needs enough time to set properly before slicing. For the best texture, chill it overnight.
✅ Press the Crust Firmly – Use the bottom of a measuring cup or a flat spoon to firmly press the crust into the pan. This ensures a sturdy base that won’t crumble when slicing.
✅ Use a Springform Pan for Easy Removal – A 9-inch springform pan makes it easier to remove and slice the cheesecake cleanly. If using a pie dish, make sure to grease it lightly for easy serving.
✅ For Clean Slices, Use a Warm Knife – Run a sharp knife under hot water, wipe it dry, and then slice. This helps cut through the cheesecake neatly without dragging the filling.
Fun & Delicious Variations
Want to switch things up? Try one of these exciting variations to put a unique twist on your No Bake Cherry Cheesecake!
1. Chocolate Lovers’ Cherry Cheesecake
- Swap the graham cracker crust for a chocolate cookie crust using crushed Oreo cookies and melted butter.
- Drizzle melted dark chocolate over the cherry topping for extra decadence.
- Sprinkle with mini chocolate chips or chocolate shavings for a beautiful finish.
2. Lemon Cherry Cheesecake
- Add 1 teaspoon of fresh lemon zest to the cheesecake filling for a refreshing citrusy twist.
- Mix in 1 tablespoon of lemon juice for an extra bright and tangy flavor.
- Garnish with candied lemon slices or a few fresh lemon zest curls.
3. Berry Bliss Cheesecake
- Instead of cherry pie filling, top your cheesecake with a mixed berry compote made from blueberries, raspberries, and strawberries.
- Add a touch of honey or maple syrup for a naturally sweet topping.
- Garnish with fresh mint leaves for a pop of color.
4. Nutty Delight Cheesecake
- Add ½ cup of finely chopped toasted pecans or almonds to the crust for extra crunch.
- Drizzle with salted caramel sauce and sprinkle with crushed nuts before serving.
5. Mini No Bake Cherry Cheesecakes
- Instead of a full cheesecake, divide the mixture into individual cupcake liners for personal-sized treats.
- Use a muffin tin or small dessert cups for easy serving.
- Great for parties and gatherings!
6. Keto & Low-Carb Cherry Cheesecake
- Use almond flour and butter instead of graham crackers for a low-carb crust.
- Replace powdered sugar with a sugar-free sweetener like erythritol or monk fruit.
- Opt for homemade cherry topping using fresh cherries and sugar-free syrup.
How to Customize Your Cheesecake Further
Different Crust Options – Not a fan of graham crackers? Try:
- Crushed vanilla wafer cookies
- Shortbread cookies
- Crushed digestive biscuits
Whipped Cream Topping – Add a swirl of homemade whipped cream before serving for an elegant touch.
Spiced Flavor – Add a pinch of cinnamon or nutmeg to the crust for extra warmth.
No Cherry? No Problem! – Swap the cherry topping for strawberry, blueberry, caramel, or Nutella drizzle!
By following these expert tips and variations, you can create a No Bake Cherry Cheesecake that’s uniquely yours—creamy, delicious, and customizable to your taste!
Frequently Asked Questions (FAQs)
Can I make No Bake Cherry Cheesecake ahead of time?
Yes! This cheesecake is perfect for making ahead. It needs at least 4 hours to chill, but overnight is best for the ideal texture. You can prepare it 1-2 days in advance and store it in the fridge until ready to serve.
How do I prevent my no-bake cheesecake from being too soft?
To ensure a firm and creamy texture:
- Use full-fat cream cheese for stability.
- Chill the cheesecake for at least 4-6 hours (or overnight).
- Avoid overmixing the whipped topping, as it can deflate the filling.
- If you need extra firmness, add ½ teaspoon of gelatin dissolved in warm water to the filling.
Can I use a different fruit topping instead of cherry?
Absolutely! You can swap the cherry pie filling for:
- Strawberry, blueberry, or raspberry pie filling.
- Fresh fruit compote made with your favorite berries.
- Caramel, Nutella, or lemon curd for a different flavor twist.
How long does No Bake Cherry Cheesecake last in the fridge?
Stored in an airtight container, it will stay fresh for up to 5 days in the refrigerator. Make sure to keep it covered to prevent it from absorbing fridge odors.
Can I freeze No Bake Cherry Cheesecake?
Yes! To freeze:
Thaw overnight in the fridge and add the cherry topping before serving for the best texture.
Wrap the cheesecake (without the cherry topping) in plastic wrap and aluminum foil.
Store in an airtight container for up to 2 months.
Conclusion
This No Bake Cherry Cheesecake is the perfect dessert for anyone who craves a creamy, indulgent treat without the hassle of turning on the oven. Its easy-to-make, no-bake crust, combined with the smooth cheesecake filling and tangy cherry topping, makes it a showstopper for any occasion—whether it’s a family gathering, holiday celebration, or a simple weeknight indulgence.
With just a handful of ingredients and a little time to chill, this cheesecake is a true crowd-pleaser that’s both quick to prepare and impressive to serve. Plus, its versatility means you can customize the flavors and toppings to match your personal preferences or the season.
Whether you’re a novice or an experienced baker, this No Bake Cherry Cheesecake guarantees a delightful dessert that everyone will love. So, next time you need a sweet and easy treat, give this recipe a try—you won’t be disappointed!
Enjoy your cheesecake, and don’t forget to share the love with friends and family.
Explore More Recipes: Visit Cucina Recipes to find even more delicious meal ideas to inspire your next cooking adventure!
Did you make this recipe?
Mention @cucinarecipes or tag #cucinarecipes!