Craving a soft, moist, and delicious gluten free cupcake that tastes just like the real thing? You’re in the right place! Whether you’re avoiding gluten due to celiac disease, gluten intolerance, or dietary preference, finding the perfect cupcake recipe can be a challenge. Many gluten free cupcakes turn out dry, crumbly, or dense, but with the right ingredients and baking techniques, you can create cupcakes that are just as light and fluffy as traditional ones.
In this guide, we’ll walk you through the best gluten free flour blends, essential baking ingredients, and foolproof tips to achieve bakery-style cupcakes at home. Plus, we’ll share delicious frosting ideas and expert tips for perfect texture and flavor every time. Get ready to bake gluten free cupcakes so good that no one will know they’re gluten free!
The Key Ingredients for Perfect Gluten Free Cupcakes

When it comes to baking gluten free cupcakes, the right ingredients make all the difference. Without gluten, achieving a soft, moist, and airy texture requires a strategic combination of gluten free flour, binding agents, leavening ingredients, and moisture boosters. Let’s break down the essential components that ensure your cupcakes taste just like traditional ones.
Choosing the Right Gluten Free Flour Blend
The foundation of any gluten free cupcake is the flour blend. Since wheat flour provides structure and elasticity due to gluten, a well-balanced alternative is necessary. Here are some of the best options:
- Gluten Free All-Purpose Flour Blend – The easiest option for beginners, these pre-mixed blends (such as King Arthur Measure for Measure, Bob’s Red Mill, or Cup4Cup) are designed to replace regular flour 1:1 in recipes. Look for a blend that includes rice flour, potato starch, and tapioca starch for the best results.
- Almond Flour – Adds a rich, slightly nutty flavor and helps create a soft, tender texture. Best used in combination with other gluten free flours.
- Coconut Flour – Highly absorbent, requiring more liquid to prevent dryness. Works well when paired with almond flour or other blends.
- Oat Flour – Naturally gluten free (make sure it’s certified to avoid cross-contamination), oat flour adds a mild sweetness and enhances moisture retention.
- Tapioca or Arrowroot Starch – These starches mimic the binding and elasticity of gluten, helping improve the structure of the cupcakes.
Why You Need Xanthan Gum or Guar Gum
Gluten provides elasticity and chewiness to baked goods, which is why gluten free cupcakes can sometimes turn out crumbly. To counter this, a binding agent is essential.
- Xanthan Gum – The most common gluten replacement in baking, helping to create structure and elasticity. If your flour blend does not already include xanthan gum, add ¼ teaspoon per cup of flour.
- Guar Gum – A plant-based alternative to xanthan gum, often used in gluten free baking for improved texture and stability.
Essential Baking Ingredients for Moist and Fluffy Cupcakes
Once you have the right flour blend, the next step is using the right supporting ingredients to enhance the structure, moisture, and flavor of your cupcakes.
Leavening Agents: Baking Powder & Baking Soda
Since gluten free flour lacks the elasticity of wheat flour, you need strong leavening agents to help the cupcakes rise.
- Baking Powder – Provides lift and helps create a light, airy crumb. Always use a gluten free baking powder to avoid hidden gluten.
- Baking Soda – Reacts with acidic ingredients (such as buttermilk or vinegar) to create a softer texture and enhance rise.
Moisture Boosters: Fats, Dairy, and Sweeteners
Gluten free baked goods can sometimes be dry or dense, so it’s crucial to incorporate moisture-rich ingredients.
- Fats:
- Unsalted Butter – Adds rich flavor and tenderness.
- Coconut Oil – A great dairy-free alternative that keeps cupcakes moist.
- Olive Oil or Vegetable Oil – Oils help retain moisture longer than butter.
- Dairy & Dairy-Free Alternatives:
- Whole Milk or Buttermilk – Buttermilk adds acidity, which helps with tenderness.
- Almond Milk, Oat Milk, or Coconut Milk – Ideal for dairy-free gluten free cupcakes.
- Sweeteners:
- Granulated Sugar – Classic choice for even sweetness.
- Maple Syrup or Honey – Natural sweeteners that also enhance moisture and softness.
- Coconut Sugar – A lower glycemic alternative that adds a mild caramel-like flavor.
Bonus Ingredients for Enhanced Flavor and Texture
While the basics will give you a great cupcake, these extras elevate the taste and texture:
- Vanilla Extract – A must-have for classic vanilla gluten free cupcakes.
- Eggs (or Egg Replacements) – Eggs add structure and moisture. For an egg-free version, use mashed banana, applesauce, or a flaxseed egg.
- Sour Cream or Greek Yogurt – Adds richness and moisture, preventing cupcakes from drying out.
Final Thoughts on Ingredients
Perfecting gluten free cupcakes starts with choosing the right ingredients. A well-balanced flour blend, proper leavening agents, and moisture-retaining ingredients will help create cupcakes that are fluffy, flavorful, and indistinguishable from traditional cupcakes. Up next, we’ll guide you through the step-by-step process of making these cupcakes at home!
Step-by-Step Guide: How to Make Gluten Free Cupcakes

Now that you understand the key ingredients for making gluten free cupcakes, it’s time to put everything together. Follow this detailed step-by-step guide to bake cupcakes that are light, moist, and full of flavor.
Step 1: Gather Your Ingredients and Tools
Proper preparation ensures a smooth and stress-free baking experience.
Essential Ingredients:
- 1 ½ cups gluten free all-purpose flour blend (with xanthan gum, or add ¼ teaspoon separately)
- 1 teaspoon baking powder
- ½ teaspoon baking soda
- ¼ teaspoon salt
- ½ cup unsalted butter (softened) or coconut oil for a dairy-free option
- ¾ cup granulated sugar (or coconut sugar for a refined sugar-free option)
- 2 large eggs (room temperature)
- 1 teaspoon pure vanilla extract
- ½ cup buttermilk (or dairy-free milk with 1 teaspoon vinegar for acidity)
Helpful Baking Tools:
- Mixing bowls for combining dry and wet ingredients
- Electric hand mixer or stand mixer for even mixing
- Cupcake liners to prevent sticking
- Muffin tin to hold the batter evenly
- Cooling rack to allow proper air circulation
Step 2: Preheat the Oven and Prepare the Pan
Preheat the oven to 350°F (175°C) to ensure the cupcakes bake evenly and rise properly.
- Line a 12-cup muffin tin with cupcake liners. If you don’t have liners, lightly grease the cups with oil or non-stick spray.
Step 3: Mix the Dry Ingredients
In a medium mixing bowl, whisk together:
- Gluten free all-purpose flour
- Baking powder
- Baking soda
- Salt
This step ensures even distribution of the leavening agents, helping the cupcakes rise properly.
Step 4: Cream the Butter and Sugar
In a large mixing bowl, beat together the softened butter and sugar using an electric mixer on medium speed. Continue mixing until the mixture is light and fluffy, about two to three minutes.
This process, known as creaming, incorporates air into the butter, making the cupcakes light and airy.
For a dairy-free option, use coconut oil and mix until smooth but not overly whipped.
Step 5: Add the Eggs and Vanilla Extract
- Add the eggs one at a time, mixing well after each addition.
- Stir in the vanilla extract for enhanced flavor.
If the batter looks slightly curdled, this is normal and will smooth out once the dry ingredients are added.
For an egg-free alternative, replace eggs with flax eggs (one tablespoon flaxseed meal mixed with three tablespoons water per egg) or unsweetened applesauce (¼ cup per egg).
Step 6: Alternate Adding Dry Ingredients and Buttermilk
To keep the batter smooth and prevent overmixing, gently fold in the dry ingredients in three additions, alternating with the buttermilk.
- Add one-third of the flour mixture and mix on low speed.
- Pour in half of the buttermilk and mix just until combined.
- Repeat until all ingredients are fully incorporated.
This method prevents overworking the gluten free flour, which can lead to dense cupcakes.
For a dairy-free option, use almond milk or oat milk with one teaspoon of vinegar to mimic buttermilk’s acidity.
Step 7: Fill the Cupcake Liners
Using a cookie scoop or spoon, fill each cupcake liner about three-quarters full. This allows room for the cupcakes to rise without overflowing.
For evenly sized cupcakes, use a standard ¼ cup measuring cup to scoop the batter.
Step 8: Bake the Cupcakes
Place the muffin tin in the preheated oven and bake for 18 to 22 minutes, or until a toothpick inserted in the center comes out clean.
Baking Tips for Gluten Free Cupcakes:
- Avoid overbaking, as gluten free cupcakes dry out faster than traditional ones.
- Rotate the pan halfway through baking for even cooking.
- The cupcakes are done when they spring back lightly when touched.
Step 9: Cool the Cupcakes Properly
- Let the cupcakes sit in the pan for five minutes before transferring them to a cooling rack.
- Cool completely before frosting to prevent the frosting from melting.
Proper cooling allows the cupcakes to set properly, improving texture and preventing sogginess.
Step 10: Frost and Decorate
Once the cupcakes have cooled, they are ready to be frosted. Choose from a variety of frosting options to suit your taste.
Popular Frosting Options:
- Classic Buttercream Frosting – A creamy and rich traditional choice.
- Chocolate Ganache – A glossy and smooth topping for chocolate lovers.
- Dairy-Free Coconut Whip – A light and airy alternative.
- Cream Cheese Frosting – Perfect for a slightly tangy sweetness.
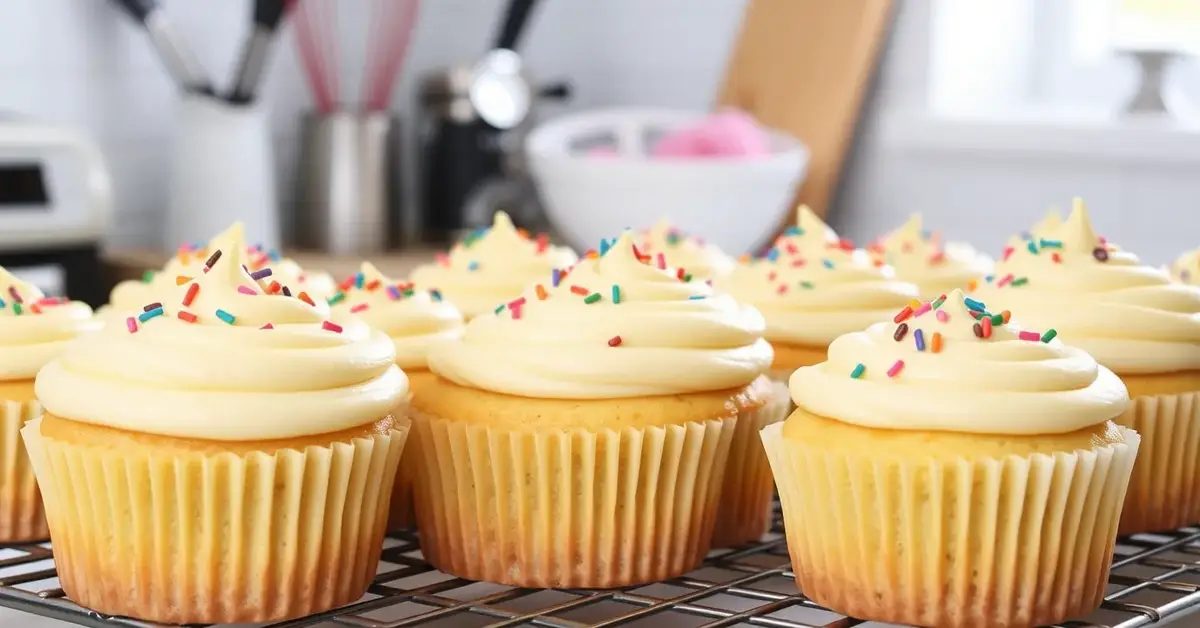
For extra decoration, top with fresh fruit, shredded coconut, gluten free sprinkles, or chocolate shavings.
Final Thoughts
Making gluten free cupcakes at home is simple when following the right steps. By using high-quality ingredients and the correct techniques, you can achieve cupcakes that are moist, fluffy, and full of flavor. Whether you are baking for a special occasion or simply satisfying a craving, these cupcakes are sure to impress.
Once you have mastered the basic recipe, experiment with different flavors, fillings, and frostings to create your own unique variations. Stay tuned for more expert tips and creative cupcake ideas in the next section.
Frosting and Topping Ideas for Gluten Free Cupcakes

Frosting and toppings add the finishing touch to your gluten free cupcakes, elevating them from simple treats to visually stunning and irresistibly delicious desserts. Whether you prefer a classic buttercream, a rich chocolate ganache, or a light and airy whipped topping, there are endless ways to customize your cupcakes to suit any occasion or dietary preference. Here’s a guide to the best gluten free frosting and topping ideas to make your cupcakes truly special.
Classic Frosting Options
A perfectly piped frosting can take your cupcakes to the next level. Here are some of the most popular gluten free frosting choices:
1. Classic Vanilla Buttercream
This timeless frosting is smooth, creamy, and pairs well with any cupcake flavor.
Ingredients:
- 1 cup unsalted butter (softened)
- 3 to 4 cups powdered sugar (sifted)
- 2 teaspoons pure vanilla extract
- 2 to 4 tablespoons heavy cream or milk
- Pinch of salt
Instructions:
- Beat the softened butter until light and fluffy.
- Gradually add sifted powdered sugar, one cup at a time, mixing on low speed.
- Stir in vanilla extract and a pinch of salt.
- Add heavy cream or milk, one tablespoon at a time, until the frosting reaches a smooth consistency.
- Whip on high speed for 2–3 minutes until light and fluffy.
Pro Tip: For a dairy-free version, use vegan butter and dairy-free milk alternatives like almond or coconut milk.
2. Rich Chocolate Ganache
For a decadent and glossy finish, chocolate ganache is a simple yet elegant choice.
Ingredients:
- 1 cup gluten free semi-sweet chocolate chips
- ½ cup heavy cream (or coconut milk for dairy-free)
- 1 teaspoon vanilla extract
Instructions:
- Heat the heavy cream until hot but not boiling.
- Pour over chocolate chips and let sit for 2 minutes.
- Stir until smooth and glossy, then add vanilla extract.
- Let it cool slightly before drizzling over cupcakes or whipping for a fluffy texture.
Pro Tip: Chill the ganache for 30 minutes and whip it with a mixer to create a lighter, mousse-like texture.
3. Dairy-Free Coconut Whipped Cream
For a light and airy topping, coconut whipped cream is an excellent alternative to traditional buttercream.
Ingredients:
- 1 can full-fat coconut milk (chilled overnight)
- 2 tablespoons powdered sugar
- 1 teaspoon vanilla extract
Instructions:
- Scoop the solid coconut cream from the chilled can, leaving the liquid behind.
- Beat with an electric mixer until soft peaks form.
- Add powdered sugar and vanilla, then mix until smooth.
- Pipe or spread onto cupcakes for a light, naturally sweet topping.
Pro Tip: To enhance the stability of the whipped cream, add ½ teaspoon of xanthan gum or cornstarch.
Creative Topping Ideas
Enhance the visual appeal and flavor of your gluten free cupcakes with these fun and delicious topping ideas.
1. Fresh Fruit and Zest
- Sliced strawberries, raspberries, or blueberries
- Lemon or orange zest for a citrusy touch
- Diced mango or pineapple for a tropical twist
Pro Tip: Lightly brush fruit with honey or jam for extra shine and flavor.
2. Chocolate Shavings and Chips
- Dark, milk, or white chocolate curls
- Mini gluten free chocolate chips
- Cocoa powder dusting for a refined look
Pro Tip: Use a vegetable peeler on a chocolate bar to create delicate curls.
3. Sprinkles and Edible Glitter
- Naturally dyed gluten free sprinkles
- Edible gold or silver glitter for a glamorous touch
- Crushed freeze-dried fruit for a colorful, tangy effect
Pro Tip: Look for brands that specifically label their sprinkles as gluten free to avoid cross-contamination.
4. Nuts and Seeds
- Toasted coconut flakes for a nutty crunch
- Crushed almonds, pecans, or hazelnuts
- Chia seeds or hemp seeds for a nutritious boost
Pro Tip: Toasting nuts enhances their flavor and adds extra crunch.
5. Caramel or Fruit Drizzles
- Salted caramel sauce for a rich, buttery contrast
- Berry compote for a fresh, fruity balance
- Honey or maple syrup drizzle for natural sweetness
Pro Tip: Warm the sauce slightly before drizzling for a smooth and glossy finish.
Decorating Techniques for a Stunning Presentation
Beyond frosting and toppings, how you apply them makes a difference. Here are a few easy ways to create bakery-worthy cupcakes at home.
1. Piping for a Professional Look
Use a piping bag with different nozzles to create swirls, rosettes, or ruffles. Popular piping tips include:
- 1M star tip – Classic cupcake swirl
- 2D closed star tip – Rosette design
- Ateco 808 round tip – Smooth dome effect
2. Dipping for a Smooth Finish
For a sleek, bakery-style look, dip the top of the cupcake into a warm glaze or ganache. Let it set before adding sprinkles or nuts.
Pro Tip: For an extra glossy finish, refrigerate the cupcakes for 10 minutes after dipping.
3. Rustic Spreading for a Homemade Touch
Use an offset spatula to spread buttercream in soft, swooping motions for a casual yet elegant presentation. This method is great for a vintage-style cupcake.
Pro Tip: Add a light dusting of powdered sugar for a final touch.
Final Thoughts
The right frosting and toppings can transform your gluten free cupcakes into a show-stopping dessert. Whether you love classic buttercream, indulgent ganache, or light coconut whip, there are plenty of delicious and allergy-friendly options to explore. Don’t be afraid to get creative with different textures, colors, and flavors to make each batch unique.
With these frosting and topping ideas, you can customize your gluten free cupcakes for any occasion—birthdays, holidays, or a simple sweet treat. Now that you have all the tools and inspiration, it’s time to get baking and decorating.
Expert Tips for Baking the Best Gluten Free Cupcakes
Baking gluten free cupcakes requires a slightly different approach than traditional baking, but with the right techniques, you can achieve soft, moist, and delicious results every time. Since gluten free flours lack the structure and elasticity of wheat flour, small adjustments in ingredients, mixing, and baking methods can make all the difference. Here are some expert tips to help you master the art of gluten free cupcake baking.
1. Choose the Right Gluten Free Flour Blend
The key to a successful gluten free cupcake lies in the flour. A high-quality gluten free flour blend will provide the right texture and structure without making your cupcakes dense or crumbly.
What to Look for in a Flour Blend:
- A mix of flours and starches – The best blends include a combination of rice flour, tapioca starch, potato starch, or sorghum flour for balance.
- Binding agents – Look for blends that contain xanthan gum or guar gum, which help mimic the elasticity of gluten.
- Pre-measured cup-for-cup blends – Many brands offer 1:1 gluten free flour blends designed to replace all-purpose flour in traditional recipes.
Pro Tip: If using a homemade flour blend, add ½ teaspoon of xanthan gum per cup of flour to improve texture and stability.
2. Measure Your Ingredients Accurately
Gluten free baking is more sensitive to ingredient ratios than regular baking, so measuring correctly is essential.
Best Practices for Measuring:
- Use a kitchen scale – Weighing ingredients instead of using measuring cups ensures accuracy, especially for flour.
- Spoon and level method – If using measuring cups, spoon the flour into the cup and level it off with a knife. Avoid scooping directly from the bag, as this can pack in too much flour.
- Avoid overloading with dry ingredients – Excess flour or starch can make cupcakes dense and dry.
Pro Tip: If your batter seems too thick, add an extra tablespoon of milk or another liquid to maintain the right consistency.
3. Use Room Temperature Ingredients
Cold ingredients can affect how your batter comes together, leading to dense or unevenly baked cupcakes.
Why It Matters:
- Room temperature eggs, butter, and milk mix more smoothly, resulting in a well-incorporated batter.
- Warmer ingredients trap air more effectively, leading to lighter, fluffier cupcakes.
Pro Tip: If you forget to bring your eggs to room temperature, place them in a bowl of warm water for 5 minutes before using.
4. Don’t Overmix the Batter
Unlike traditional cupcake batter, which benefits from some gluten development, overmixing gluten free batter can lead to dense, gummy cupcakes.
How to Mix Properly:
- Mix just until the ingredients are combined and smooth.
- Use a spatula to fold in dry ingredients gently instead of overbeating with an electric mixer.
- Let the batter rest for 15–20 minutes before baking to allow the flour to absorb moisture.
Pro Tip: Resting the batter helps prevent a gritty texture, especially with rice-based gluten free flours.
5. Add Extra Moisture and Fat for Better Texture
Gluten free baked goods tend to dry out faster than their wheat-based counterparts. Adding a bit more moisture and fat can improve the texture.
Ways to Prevent Dryness:
- Use extra eggs or egg yolks to add richness.
- Add a tablespoon of sour cream, yogurt, or applesauce for extra moisture.
- Increase the fat content slightly by using butter and a bit of oil together.
Pro Tip: A small amount of honey or maple syrup can help retain moisture while adding natural sweetness.
6. Bake at the Right Temperature and Time
Gluten free cupcakes bake differently from traditional ones, so adjusting your oven settings slightly can help achieve the best results.
Oven Tips for Gluten Free Baking:
- Use an oven thermometer – Many home ovens can run hotter or cooler than the set temperature, which affects baking time.
- Bake at a slightly lower temperature – 325°F (163°C) instead of 350°F (177°C) can help prevent dryness and ensure even baking.
- Avoid opening the oven door too soon – Sudden temperature changes can cause cupcakes to sink. Wait until at least 75% of the baking time has passed before checking.
Pro Tip: If your cupcakes tend to brown too quickly, tent them with aluminum foil for the last few minutes of baking.
7. Use the Right Liners and Pans
The type of cupcake liners and baking pans you use can affect texture and ease of removal.
Best Baking Tools for Gluten Free Cupcakes:
- Grease-proof cupcake liners – Prevents sticking and helps cupcakes retain moisture.
- Nonstick muffin tins – If not using liners, lightly grease the pan with butter or cooking spray.
- Dark vs. light-colored pans – Light-colored pans bake more evenly, while dark pans may overbrown the edges.
Pro Tip: For extra soft cupcakes, place a pan of water on the bottom rack of the oven while baking. The steam keeps the cupcakes from drying out.
8. Check for Doneness the Right Way
Gluten free cupcakes may look done on the outside but still be undercooked inside.
How to Tell When They’re Ready:
- Insert a toothpick in the center—if it comes out with a few moist crumbs, they’re done.
- Press lightly on the top—if it springs back instead of sinking, they’re baked through.
- Look at the edges—slightly pulling away from the liner is a good sign.
Pro Tip: If the tops are too firm but the insides are undercooked, reduce baking time by 2–3 minutes and cover with foil.
9. Cool Cupcakes Properly Before Frosting
Cooling gluten free cupcakes correctly prevents them from becoming soggy or breaking apart.
Cooling Tips:
- Let cupcakes cool in the pan for 5 minutes before transferring them to a wire rack.
- Avoid leaving them in the pan too long, as trapped heat can cause excess moisture buildup.
- Wait until cupcakes are completely cool before frosting—warm cupcakes can cause frosting to melt.
Pro Tip: If you need to speed up cooling, place the cupcakes in the fridge for 10–15 minutes before frosting.
10. Store Cupcakes to Maintain Freshness
Gluten free cupcakes can dry out quickly, so proper storage is essential.
How to Keep Them Fresh:
- Store in an airtight container at room temperature for up to 2 days.
- Refrigerate for up to 5 days, but bring them to room temperature before serving for the best texture.
- Freeze unfrosted cupcakes for up to 2 months. Thaw at room temperature before frosting.
Pro Tip: To keep cupcakes moist, place a slice of bread in the container with them—the bread will absorb excess air and prevent drying.
Final Thoughts
Baking the perfect gluten free cupcakes is all about the right techniques and a little patience. By choosing high-quality ingredients, measuring precisely, and adjusting baking methods to suit gluten free needs, you can achieve light, fluffy, and flavorful cupcakes that taste just as good as (or even better than!) traditional ones.
With these expert tips, you’ll be well on your way to mastering gluten free cupcake baking. Happy baking!
Frequently Asked Questions (FAQs)
Can I use a single type of gluten-free flour for cupcakes?
While it’s possible to use a single type of gluten-free flour, it’s best to use a blend of gluten-free flours. Gluten-free flour blends often combine rice flour, potato starch, and sorghum flour, along with a binding agent like xanthan gum. This combination provides the texture and structure needed for cupcakes to rise properly and avoid being dense or crumbly.
Can I substitute regular sugar with a sugar alternative in gluten-free cupcakes?
Yes, you can substitute regular sugar with alternatives such as coconut sugar, honey, or maple syrup. Keep in mind that the consistency of your batter may change slightly, and you may need to adjust the liquid levels if using a liquid sweetener. Always check the package for conversion guidelines when substituting sugar alternatives to maintain the right balance of sweetness.
Why are my gluten-free cupcakes dense and heavy?
Dense cupcakes can occur for a few reasons: overmixing the batter, using too much flour, or not using the right gluten-free flour blend. To avoid this, ensure you’re measuring your flour accurately, mixing the batter gently, and letting the batter rest before baking. Additionally, adding extra moisture (like yogurt or applesauce) can help keep your cupcakes light and fluffy.
How can I make my gluten-free cupcakes extra moist?
To make your gluten-free cupcakes extra moist, consider adding ingredients like yogurt, sour cream, or mashed bananas. These ingredients help retain moisture during baking. You can also try using a combination of butter and oil to add richness. Be careful not to overbake your cupcakes, as this can lead to dryness.
Can I freeze gluten-free cupcakes?
Yes, gluten-free cupcakes freeze well. To freeze them, allow them to cool completely, then wrap them tightly in plastic wrap and store in an airtight container or freezer bag. They can be stored for up to 2 months. When ready to enjoy, thaw at room temperature, and frost once they are fully cooled. Freezing cupcakes without frosting is recommended to maintain freshness.
Conclusion
Baking gluten-free cupcakes doesn’t have to be a challenge, and with the right ingredients, techniques, and tips, you can create delicious, light, and fluffy treats that everyone will enjoy. Whether you’re baking for a special occasion or just satisfying a sweet craving, these cupcakes offer a delightful alternative without compromising on taste or texture.
By selecting the right gluten-free flour blend, measuring accurately, and following the steps outlined in this guide, you can ensure your cupcakes turn out perfect every time. And don’t forget about the frosting and topping ideas—customizing your cupcakes with unique flavors and textures will make them even more irresistible.
With a little practice and the expert tips shared here, you’ll become a gluten-free baking pro in no time. Enjoy the process and savor the results—your taste buds (and anyone lucky enough to sample your cupcakes) will thank you! Happy baking!
Explore More Recipes: Visit Cucina Recipes to find even more delicious meal ideas to inspire your next cooking adventure!
Did you make this recipe?
Mention @cucinarecipes or tag #cucinarecipes!